Showing posts with label Gypsy Spot. Show all posts
Showing posts with label Gypsy Spot. Show all posts
Saying Goodbye to the Gypsy Spot
Gypsy Spot Mini Mailbox Challenge
I began by covering the mailbox with a 4 x 12 inch strip of pink polk-a-dot cardstock. I knew I wanted to use the Pink Paislee Cupid paper in some way, but I was not certain about how to incorporate the large flower print. And then I remembered circle punches!! I cut several of the flowers from the Pink Paislee paper using 1.25 inch and .75 inch circle punches. I then raided my Prima floral and gem brad stashes and then I cut two mailbox door covers from the Pink Paislee paper.
Gypsy Spot Challenge - 3M Adhesive Backed Paper
Hello bloggers, happy Tuesday. This week at the Gypsy Spot we were challenged to use 3M's Post It brand paper, which has adhesive on the back with a peel off cover. I received three 8.5 x 11 inch sheets of the 3M paper - red, pink and white. So of course I immediately thought VALENTINE'S project.
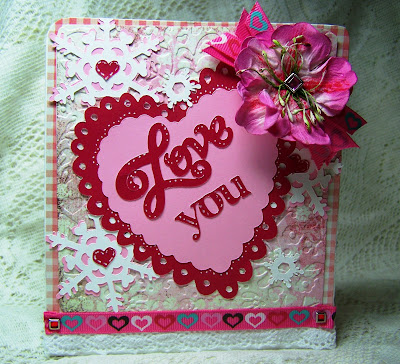
I used my Gypsy and five cricut cartridges to design and cut this card: Sweethearts, Tie the Knot, George, Graphically Speaking and Winter Woodlands. Since so much of the nation is experiencing winter weather this Valentine's day, I chose the heart snowflake cut on Tie the Knot as a primary accent cut. The tiny red hearts in the middle of the heart snowflakes were cut from George. I added small snowflakes from Winter Woodlands to accent the three larger snowflakes.
The layered scalloped hearts are from the Sweethearts cartridge as is the word LOVE in the middle of the top heart. The word YOU is from Graphically Speaking. I wanted a plain font so as to not draw attention away from the word LOVE.
The base card was cut from Sweethearts and the rectangle on the top of the card was cut from George. I used a new Valentine Cuttlebug embossing folder on the background rectangle to add texture.
The flower is a Prima product and can be purchased at Custom Crops. The ribbon was from my stash. The brads are Stampin' Up brand. I hope that you and you Valentine snuggle up warmly this Valentine's Day!!
Note: The cut file has been added to the list of cut files at the right - 3M Love Valentine Card.
Gypsy Spot Tuesday - Super Bowl Themed Challenge
This is the first time in the history of the team that the Saints have made it to the Super Bowl. If that wasn't reason enough to cheer on the Saints, my husband and I lived in New Orleans the first year we were married (28 years ago). And that same year, the Saints drafted a friend from college.
I used three different cartridges on my Gypsy to create this center piece: Everyday Paper Dolls, George, and Sweathearts. This was the first project made with my new blue Expression and I have to say, I was having some difficulty with the mat sliding. If this continues to be an issue, I may have to switch back to the regular Expression.
Gypsy Spot Tuesday - Black & Gold Challenge
It's Tuesday and that means the challenges are up at the Gypsy Spot blog. This week Nilda challenged the team to use the colors black and gold to create any project of our choice. Since I had missed the BBTB2 challenge last week where they used the boy and girl Valentine cuts from A Child's Year, I decided to use that cut.
It's a Party at the Gypsy Spot
Okay that may be a slightly misleading title... But it is PARTY FAVORS at the Gypsy Spot!!! This week's Gyspy challenge was to design a party favor. I created a party favor bag for a tobogganing party - doesn't it just scream winter chill and fun in the snow?
Now this tobogganing party - it will NOT be happening here in SC!! But these great little favor bags would be perfect for those in snowier climates to give the kids at the tobogganing party as well as to take along for members of your ski weekend!!!
I used a number of different cartridges to create this bag, welded shapes, and topped the design off with the frosty snow couple cut from Gypsy Wanderings. Mr. and Mrs. Snowpeople look adorable on thier snowy background.
It's a Gypsy New Year Project
The Gypsy Spot is back from the holiday break!! The challenge this week at the Gypsy Spot was to create a round card and include welded numbers 2010. I tweaked the requirements a bit and created an oval card where the zero (0) is the card shape.
I used Gypsy Font for my basic card. I welded 2010 at two inches, but increased the size of the first zero to four inches, making the cut in black cardstock. I then used the blackout shadow of the zero to create the welded card base, cut in white cardstock. Next I welded the blackout shadow of 2010 and cut it in gold metallic paper.
I found the word Happy on the Christmas solutions cartridge and added the word to the front of the card, in black and gold. And finally, I took the party horn from the Celebrations cartridge and again using metallic papers, I used pop dots and attached the horn to the front of the card.
I hope that you all had a happy new year... and that 2010 is a wonderful year for each of us.
Gypsy Spot Weekly Challenge - A Christmas Card
This weeks challenge at the Gypsy Spot is to use the Gypsy to make a Christmas Card. While I was enjoying the tag shapes on Winter Woodlands I went ahead and designed a second card with this shape as a base. I added scalloped eyelit edges on the card to dress it up a bit.
The card was constructed of Core'dination cardstock. I am really enjoying the Core'dination line. I purchased a variety of colors and finish treatments from Custom Crops as they have a huge selection (and a sale thru this Wednesday night). The base card was cut in White-washed white cardstock. The base tag was cut in red Core'dination cardstock and the top layer tag was cut in peach White-washed Core'dination. If you look closely you can see where I sanded the edges to allow more of the "core" color to peek through.
The flowers and words feature multi-layered cuts, each featuring a light green base cut. The words are topped in the same red Core'dination cardstock and the flowers feature a white layer then repeats of the red and peach colors. The flower centers were made using German ground glass (also available at Custom Crops).
I finished my card off with a ribbon and bow, but I am not sure what is going on with the color of the ribbon... It is an irredescent light green ribbon with streaks of pink and gold... but it photographed yellow! Seriously, I have no idea why that happened.
Just like the Bitten by the Bug blog, the Gypsy Spot will also be taking a two week vacation. Fear not, both sites will return the first week of January!
Gypsy Spot Snow Challenge
This week's challenge at the Gyspy Spot was to use snow or snowmen in a Gyspy created and cut design. I used my new Snow Friends cartridge along with Accent Essentials and Winter Woodlands to make a Let It Snow layout.
My layout features these two happy dancing snowpeople playing in the falling flakes. The snowpeople are trimmed in white ink dots and mini pearls. The blue sweater snowman is trimmed in white pearls, where as the pink and burgundy snow-woman is trimmed in pink mini pearls. Even snow-women like to be pretty. And don't you just love the striped hat?
Above is a close up of my snowman doing his winter storm happy dance!
Not to be out done, the snow-woman is doing an Irish Jig as her happy dance!
Subscribe to:
Posts (Atom)


