Showing posts with label Recipes. Show all posts

Red Velvet Merry Christmas with the Cricut Cake - and Blog Candy


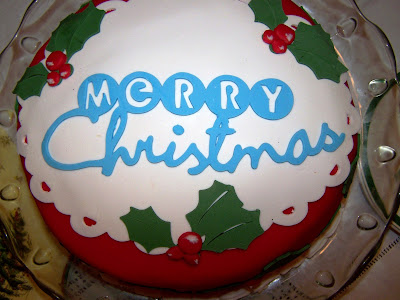
Are you looking for a special cake to serve family and friends during Christmas week?  Let me suggest this Happy Christmas Red Velvet cake.

This cake was soooo good and looked so pretty when cut.  I thought the recipe sounded odd so I took a sample to our friend Bill.  Bill is a connoisseur of red velvet cake and he loved it.  Soooo, all of that oil and sugar baked up wonderfully.  This is NOT a weight watchers friendly cake.  It IS a special holiday treat for you, your family, and guests.


Red Velvet Cake 

Unsalted butter, softened, for pans
4 tablespoons unsweetened cocoa
powder, plus more for dusting
5 cups cake flour, not self-rising
2 teaspoon salt
3 cups sugar
3 cups canola oil
4 large eggs
4 tablespoons red food coloring
4 teaspoon pure vanilla extract
2 cup low-fat buttermilk
3 teaspoons baking soda
4 teaspoons white vinegar

DIRECTIONS
1. Preheat oven to 350 degrees. Butter 3 nine inch pans; line with parchment paper. Butter lining; dust with cocoa, tapping out excess. Set aside.

2.Whisk together flour, salt, and cocoa in a medium bowl; set aside.

3. Mix sugar and oil on medium speed in the bowl of an electric mixer fitted with the whisk until combined. Add eggs one at a time; mix well after each addition. Mix in food coloring and vanilla. Add flour mixture in 3 batches, alternating with the buttermilk and beginning and ending with flour, mixing well after each addition. Scrape down sides of bowl as needed.

4. Stir together baking soda and vinegar in a small bowl. Add baking-soda mixture to batter, and mix on medium speed 10 seconds.

5. Pour batter into prepared pans. Bake until a cake tester inserted into centers comes out clean, 30
to 35 minutes. Let cool completely in pans on wire racks.  You may split the layers in half vertically for a taller cake, though I did not split the layers on this cake.


Vanilla Cream Cheese Frosting:

2 (8 ounce) package cream cheese,
softened
1/2 cup butter, softened
4 tablespoons sour cream
4 teaspoons McCormick® Pure Vanilla
Extract
2 (16 ounce) box confectioners' sugar

Beat cream cheese, softened butter, sour cream and vanilla in large bowl until light and fluffy. Gradually beat in confectioners' sugar until smooth.  Cool cake completely.  Add frosting between all layers, on top and on the sides.  We like this frosting so I make a large batch.


 The frosted cake was covered with red Fondarific fondant.

In all cases I chilled the 1/8th inch thick rolled gum paste before cutting.  Immediately after cutting, before removing the cut from the mat, I return the mat to the 'frig for another 20 minutes.  I then remover the cut and added it to the cake.  During the chill time, cut the next mat.

Using Cake Basics I cut the large doily for the top of the cake in white Cricut gum paste.  I added Wilton blue food paste to Cricut white gum paste to create the blue gum paste.  I used Holiday Cakes and cut out the Happy Christmas phrase. 

I added Wilton evergreen food paste to the white Cricut gum past to create the green gum paste.  I used the Stretch Your Imagination cartridge to cut the holly leaves.

Using the left over red fondant, I made the holly berries by hand. I added a touch of white gum paste to each berry as a highlight.

Decorating this cake was truly pretty easy, just remember to chill all fondant/gum paste before cutting and after cutting before you remove them for the mats. 


Because I have not shared a cake in soooo long (darned weight watchers!), I am offering a special Christmas blog candy. ...A chance to win a $50 Merry Christmas Gift Voucher from Custom Crops!!!  Just become a blog follower and leave a comment telling me about your favorite flavor of cake and you will be entered. 

I will draw one winner (combining comments from both blogs) this Friday so that you may have time to get yourself a great holiday gift.  This will be open to both of my blogs!


One more thing - My friend Terri over at Stamps Alive - see the link in the right hand column - is having a sale on Copic Markers!!!  Go Terri!


Here is the deal: 
Copic Sketch Sale! Buy 10 @ $5.15 Pick 4 FREE!! Do the Math!
Must Order by Friday the 17th at Midnight (pacific time)
email Terri @ stampsalive@cox.net to order!

Cooking Up Heathier Eating


I have been on my own this week as my husband is away on a business trip.  Just prior to his departure I started making efforts to lighten up and "healthy-up" our menus.  While he has been away I have cleaned out and reorganized the pantry, including tossing a few items and replacing others with lighter, healthier versions.  I also found out about a once-a-week organic market here in Aiken.  So on Tuesday Katie and her baby Sophie, and I went to the organic market and puchased fruits and veggies.  Every other week the market will also have cheeses and butters so I picked up some organic gouda and organic butter with sea salt.  WOW.  Both are fantastic.


One of the few good things that happens when Doug travels is that I make and eat items that he would not enjoy but that I really like.  Yesterday I prepared Scallops and Risotto.  I found the recipe HERE.  Even if you do not make the recipe you should read the section on selecting scallops (which were on sale at my local Publix yesterday!!).  Also, in the spirit of full disclosure, I did not make the recipe exactly as written.  I omitted the slaw and added a salad on the side.  Also, I forgot to purchase green onions so I just skipped them.   The rice, onions, butter, olive oil and chicken stock were all organic.  The scallops are cooked in a bit of olive oil until the edges caramelize.  They had a fabulously light crispness on the edge with the tender insides.


This salad was also wonderful.  I used spring mixed greens with some baby spinach.  I add some plum tomatoes, oranges, and topped this with a raspberry pomegranite vinegarette.  Everything but the dressing (which is made by Ken's) was purchased at the organic market. 

Everything I have tasted thus far that was purchased at the market has been wonderful.  I have found the flavors to be fuller.  I cannot wait to see what wonders they will have for me next week!!!

Chocolate Cake IS Serious Dessert Time!


I have been MIA from my scrap room this week.  Family and work have kept me busy, which was nice.  But I have no such excuses for today. I have spent a big part of the day in the kitchen and I enjoyed every moment (except for the milk splash).  I made a layered salad as a side dish for dinner, which is done is staged steps.  And then I moved on to dessert!   I made this FABULOUS Chocolate Zucchini Pecan multi-layer cake!


For those who may be wondering, I am going to be including an occasional recipe here on my blog.  In addition to paper crafting, I also really enjoy cooking.  I am currently especially enjoying baking, but I will add other recipes as time passes. 


And speaking of baking, I love chocolate cake.  Chocolate cake is the stuff of serious dessert time!  And this cake is better than most.  The layers are sweet and moist.  The zucchini cooks nicely so that it is not screaming "veggies hiding here".  And the nuts are a nice flavor and texture addition.   And the frosting.  OH MY GOSH!  Fluffy, sweet, and creamy.


I am including the cake recipe below, include my adjustments.  This cake would be great with several different types of frosting.  I went with flour paste based frosting, one and one-half batches of my recipe (posted previously).  Yummy.

Chocolate Zucchini Pecan Cake
Ingredients:
• 3 1/2 cups sifted cake flour
• 3/4 cup unsweetened cocoa powder
• 1.5 teaspoon baking soda
• 1.5 teaspoon salt
• 3 1/2 cups sugar
• 3/4 cup (1.5 stick) unsalted butter, room temperature
• 3/4 cup vegetable oil
• 3 large eggs
• 1.5 teaspoon vanilla extract
• 3/4 cup buttermilk
• 3 cups grated unpeeled zucchini (about 2 1/2 medium)
• 1 1/4 cup chopped pecans

Preparation:
Preheat oven to 325°F. Prepare three 9-inch cake pans with butter and flour.
Sift flour, cocoa powder, baking soda and salt into medium bowl; set aside.
Beat sugar, butter and oil in large bowl until fluffy. Add eggs 1 at a time, beating well after each addition. Beat in vanilla extract. Mix in dry ingredients alternately with buttermilk in 3 additions each. Mix in grated zucchini. Mix in chopped nuts. Divide batter evenly into prepared pans.

Bake cake until tester inserted into center comes out clean, about 35 minutes.  Cool cake completely in pans.
-Prepare frosting-
Remove pans and bring to room temperature. Frost each layer as you add it to the cake plate.  Spread remaining frositng on the sides of the cake.

Cake and Frosting Recipes - From Last Weekend

The cake I made last weekend is just crumbs in the platter now, but I was asked by a few of you to share the recipe.  I changed the original recipe in that the recipe called for seedless raspberry jam filling, but my dh prefers strawberry so I used strawberry preserves.  Otherwise I followed the recipe exactly.  This is my version of the cake recipe (Name changed to reflect our preferred filling). One more note, the frosting recipe is for a two layer cake.  I would suggest making 1.5 batches of the frosting for better coverage on your cake.

Strawberry-Laced Vanilla Cake

1 1/2 Cups of Butter, softened
1 1/4 Cups of Sugar
3 1/3 Cups of Cake Flour ( or 3 cups of all-purpose flour) * I used cake flour
2/3 Cup of milk
1 Tbsp of Baking Powder
1/2 tsp of Salt
1 1/2 tsp of Vanilla Extract
1/4 tsp of Baking Soda
4 Large Eggs
1 12 oz. Jar of Strawberry Preserves

Frosting (Recipe below)

Grease and flour three nine-inch round cake pans.  Preheat oven to 350 degrees.

In a large bowl with mixer on LOW speed beat butter and sugar just until blended.  Increase mixer speed to HIGH and beat for ten minutes, scraping bowl often.  Add to the bowl:  flour and the next six ingredients (though the eggs).  Mix on LOW speed until well mixed.  Increase mixer speed to high and mix for two minutes, occasionally scraping the bowl edges.

Spoon the batter evenly into the three prepared pans.  Bake for 25 minutes or until a toothpick inserted into the middle of the cake comes out clean.  Remove from the oven and cool in the pans for 10 minutes.  Remove from the pans and cool on a wire rack to cool completely.

Make the frosting (recipe below). 

Using a serrated knife, cut each cake layer in half horizontally to make six cake layer.  Assemble as follows:

Place the bottom half of a layer with the cut side up on a cake plate.  Spead 1/3 jar of strawberry preseves over the layer.  Top with the cake top half layer; spread with frosting to cover.  Top with the second cake bottom half and agains spread with 1/3 of the jar of preserves.  Top with the second top half layer and again spread with frosting.  Repeat for the last two layer, ending with frosting on the top of the cake.  Spread the remainging frosting around the sides of the cake.  Enjoy!


Whipped Frosting
1/4 Cup of Flour
1 Cup of Milk
1 Cup of Butter
1 Cup of granulated Sugar
Dash of Salt
1 tsp of Vanilla

Prepare the flour paste:
In a small sauce pan combine 1/4 cup of all purpose flour and 1 cup of milk.  Whisk to blend.  Over medium high heat cook mixture until thick and smooth.  Set aside and cool completely.

Prepare Frosting:
Beat 1 cup of butter for four minutes.  Add 1 cup of granulated sugar and beat for an additional four minutes.  Add the cooled flour paste and beat again for four minutes.  Add a dash of salt and 1 tsp of vanilla and beat to mix well. 

Frosting will be light and fluffy, like whipped cream.


Buried in Cookies, Gift Wrap, Ribbon & Bows, and Other Signs of the Season


I have been missing from my blog for several days now.  I just popped out from under the gift wrap, with flour on my face, to wish you all a Merry Christmas!!!  I did manage to complete one last project before closing up my scraproom for the holidays. 


My lovely next door neighbor is creating a cookbook for her son.  She purchased a one inch ring bound notebook at a local office supply store which fits 5 1/2 x 8 1/2 inch paper to use as the recipe book.  This is the type of notebook she purchased.  She plans to print two recipes per page, using the landscape view, then cut the sheet in half and place in the notebook with divider tabs.  She wisely purchased a presentation style notebook with an plastic cover for sliding in a cover sheet and spine label.


This is where I came in.  My neighbor graciously allowed me to create the cover for her cookbook.  I had such fun with this.  I actually designed two covers, but went with a more traditional look, which my neighbor loved!  The file required only two cartridges, A Child's Year and Winter Woodlands.  I will add the cut file to the downloadable cut files on the left side of the blog, just in case anyone else is interested.  Though I will say that this is a very basic cut file. The cut file title is Mom's Recipes for Chris.


Once again, I wish each of you a VERY MERRY CHRISTMAS!!!!

Cooking Up Some Fun


Sorry for the delay but I am going to share another of my projects at Custom Crops this week. Is there a cookie exchange in your future???  I hosted a cookie exchange two weeks ago where we shared cookies and recipes.  I used the From My Kitchen cartridge and dressed my recipe up in this flip up oven door card. 


I used the oven cut, stretched a bit wider than normal, and welded two oven doors to create the flip up recipe-oven-door.  The pdf'ed recipe fits perfectly in the flip up area.


Complete directions and the cut file, along with the recipe for my favorite Christmas cookie, are available at Custom Crops.  Click HERE for all for the everything you need to create your own oven recipe cards.