Showing posts with label Stampin' Up. Show all posts
Happy Birthday Card to Wrap Up a Fun Week
What a week it has been! The only think that could possibly top Cricut's 5th Birthday Party and release of the Expression 2 was a Royal Wedding! I may need the weekend to recover from this fun, fun week. I thought I would wrap up the week with a fun birthday card.
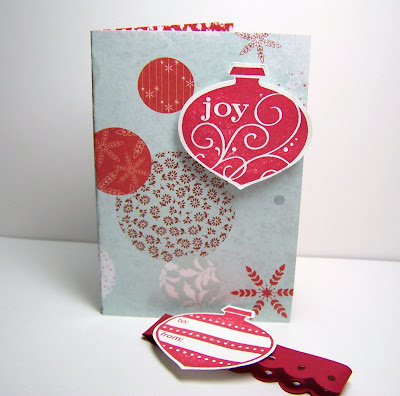
The card was created using Imaginesce cardstock and chipboard stickers, the I-Top tool, Stampin' Up stamps, and a Stampin' Up punch. I really like the bright and festive look of this card. The cake and present chipboard stickers really pop off of the brown cardstock on the cover, but then I took the card to the next step. I added a stamped and punch tag, color coordinating flowers, and an I-Top brad.
I like the fold of the card. Begin with a 12" strip of cardstock. Fold the cardstock in half. Then fold the top half of the card in half again, folding back toward the fold. You will create an uneven Z fold. You then attach a small rectangle to the top half of the card. The photo above shows this fold far better than I could possibly explain it to you.
The top of the card pulls to the left to open. Inside the card I stamped Happy Birthday again and left plenty of space to write a personalized message.
Stamps + Nesties = Quick and Cute Easter Cards
Blessed Good Friday to all who celebrate. I thought I would take a break from my in-home projects I have had going part of this week and share my three final 2011 Easter Cards. Earlier this winter I purchased this adorable little Easter girl stamp as party of a Stampin' Up set. I just had to make a few cards with her before the season passed.
I used Stampin' Up Rose ink and stamped the image on smooth white cardstock. I used classic rectangular nesties and one of the newer label sets to cut out my girl and her mattings. I whipped up some quick cards using leftover Easter papers and white ribbon and pop dotted the stamped images on to the front of the cards. I added a pink button with floss to each card.
I also stamped the image using Stampin Up "Almost Amethyst" ink and purple cardstock. I did not show you the entire purple card because the purple looks horrid against my bright pink background. This pink/purple combination was visually offensive!
I am excited because my younger son arrives in from Atlanta today. The Easter bunny had to do a bit of last minute shopping this week. I also have to finish Aaron's and Crissie's baskets, though I did get Crissie a Zoku frozen pop maker. I have one and Doug and I love it. Homemade pudding pops are wonderful.
With my family in town for Easter I probably will not post again until Monday - we have a lot of activities planned for the weekend. I wish you all fabulous weekend and a very special Easter!!
Merry and Bright Cards
What happens you combine Echo Park cardstock with a Stampin' Up stamp and Spellbinder's Nestabilities? You get fun Christmas cards that are as cute as they are easy! Including stamping, heat embossing, cutting out the elements and assembling, I made these two card in about thirty minutes!
I began by stamping the Merry and Bright Stampin' Up phrase in embossing ink on smooth white cardstock. I topped the embossing ink with bright red embossing powder and heat embossed. Using round nesties, I cut out the Merry and Bright phrase. I used red chalk to highlight the edge of the white circles and then I used Nestie's Lacey Circles and cut out the lacey matting.
I affixed the Merry and Bright circles to a fun snowflake print by Echo Park atop a glittery blue mat. Stampin' Up ribbon was added, as well as fun glittery corners and then the entire card front was mounted onto a red card.
The inside of the card was stamped with a Stampin' Up Christmas greeting and two little red snowflakes. The cards have matching red envelops that were stamped with white snowflakes.
And now I have to go wrap the two items that UPS delivered after dinner.... And I had foolishly thought I was finished wrapping!! I checked my list and discovered that I have three more items due in this week and UPS confirms that they are on their way! So five more packages to wrap and THEN I will be done!!
Mother's Day Cards By Andrea
Oh Hello! Guess who entered her photos but forgot to type in the text?? Yes, that would be me!
This is a lovely card designed by my neighbor, Andrea. Andrea had the scrapping ladies over to make Mother's Day cards. Andrea has a plethora of stamps and ink pads; the woman could easily start her own store! Or maybe start giving stamping lessons!
I only made one change on Andrea's design, I added doodle dots. But even then Andrea made suggestions. I am so lucky to have such a talented and super-nice neighbor!!
Chocolate Cupcake, Blog Hop, and Fabulous Blog Hop Candy
Gift Card Holders Featuring New Stampin' Up Toys
What a busy day I had in my scraproom! I cut and assembled two projects that you will get to see in a week or so, and I played with my new Stampin' Up toys! At stamp club last month I purchased a cute set of ornament stamps and a matching ornament punch. Tonight I finally opened the packages!
I made a few gift tags for the gifts I am making for the ladies at work. Then I moved on to my main event: Gift Card holders! Or should that be gift card cards? Which ever...
My cards were made using 4.5 x 11 inch cardstock, scored and folded. I looked at a few web sites for instructions on how to cut out the slot for the gift card, but in the end I made up my own way.
The card holders were super easy to cut and assemble. The most difficult part, oddly, was finding the right Christmas cardstock. I used the trusted "trial and error" method and only disposed of one card.
Stampin' Up - Cricut - Spellbinders Combo Card
Last Saturday our local Stampin' Up Demonstrator had a post-convention Open House. I dropped by to oohhhh and aahhh over her latest products, check out her (awesome!) make and take, and to hear about her convention. I found that Steph was selling some of her older stamp sets. All last year I eyed a specific stamp set, but kept finding other things I thought I needed when ordering. But guess who had that set on sale?
This card is the first made with my new stamp set; I love these tags. I did not have the correct punch for the stamp set.... But cricut had the correct cut!!! I found a square tag on one of my cartridges with the same number of scallops!! Wooo-hooo! I cricut cut my tags, then stamped!!!
There are three stamps in the set, so I still have two more stamps to use yet!!
Subscribe to:
Posts (Atom)